Tuesday, January 27, 2026

Chris' 2026 Private Teaching Schedule

 Chris will not be teaching private lessons on the following dates in 2026:

January 1, 2026
February 2, 3, 4, 5, 9, 12
March 9, 10, 11, 12
April 13, 14, 15, 16
May 11, 12, 13, 14
June 15, 16, 17, 18, 22, 23, 24, 25
July 20, 21, 22, 23
August 10, 11, 12, 13
September 7, 8, 9, 10
October 12, 13, 14, 15
November 23, 24, 25, 26
December 21, 22, 23, 24, 28, 29, 30, 31
January 2027:  25, 26, 27, 28

It is important that you understand your lesson time is reserved for you.  If you are unable to make a lesson, please me know as soon as possible.  If you miss a lesson, you will be expected to pay for that lesson unless you are sick or have a true emergency.  If you are missing a lesson because of a birthday party, date, prom, school event, vacation, etc., you will be expected to pay for the missed lesson(s). This has always been store policy, but it has not always been strictly enforced.  If you have frequent emergencies or illnesses, we can discuss what the best solution would be.  Sometimes I am able to schedule make-up lessons, in which case you would not have to pay for the missed lesson.

Friday, January 10, 2025

My $10 Trombone

Most people are surprised to learn that I play wind instruments.  They know me from bluegrass, and they know I play banjo, fiddle, guitar, and other string instruments.  They don't know that I played euphonium and trombone in junior high, high school and college.

What I actually wanted to play when band started in the 6th grade was the flute.  But my two sisters before me quit band, so I had to take an instrument that the school provided.  What was my next choice?  Tuba!  But, alas, they said I was too small.  So I chose the next biggest instrument the school provided -- the euphonium!  My band director, Linda Wegmann, played euphonium, and she was such an inspiration to me!  I had to wait for my euphonium.  Two other boys got the first pick, and there were only two euphoniums.  So I sat in band class each day for several weeks with no horn.  I watched and listened and took everything in.  Then...my horn arrived!  I was so proud of that horn!  I had to drag that thing on the school bus every day to and from school.  Yes, I practiced.  Yes, I took my horn home every day. We had band every day in school.

Now you are probably wondering where the trombone actually fits in.  It doesn't until high school.  I was going to Hillsboro High School at the time where Mark Trautwein was my band director.  He was a great teacher!  And now there was JAZZ BAND...!!!  And another trombone player named Daniel that I thought was so cute!  Not to mention the guitar player, Ralph!  Of course, I just HAD to get into jazz band.

Every week, my Dad and I would go to the Big Pevely Flea Market.  We would set our watches in the parking lot to the minute.  Then Daddy would let me browse the entire place by myself as long as we met back at the designated area at the appropriate time.  This is where I bought all my instruments!  I didn't have much money, but I saved it all for the flea market.  I bought a trumpet, a cornet, a snare drum, guitars, a fiddle, a saxophone, and probably more!  But Daddy bought me a trombone for $10!  I took it home and taught myself to play it.

And I played that trombone all through high school and in college!  I still have that $10 trombone, and I still play it.

Chris' 2025 Private Teaching Schedule


Chris will not be teaching private lessons on the following dates:

January 27, 28, 29, 30 (updated)

February 17, 18, 19, 20

March 10, 11, 12, 13

April 14, 15, 16, 17

May 12, 13, 14, 15

June 9, 10, 11, 12, 16, 17, 18, 19

July 21, 22, 23, 24

August 11, 12, 13, 14

September 1, 2, 3, 4

October 20, 21, 22, 23

November 24, 25, 26, 27

December 22, 23, 24, 25, 29, 30, 31

January 2026:  1

It is important that you understand your lesson time is reserved for you.  If you are unable to make a lesson, please me know as soon as possible.  If you miss a lesson, you will be expected to pay for that lesson unless you are sick or have a true emergency.  If you are missing a lesson because of a birthday party, date, prom, school event, vacation, etc., you will be expected to pay for the missed lesson(s). This has always been store policy, but it has not always been strictly enforced.  If you have frequent emergencies or illnesses, we can discuss what the best solution would be.  Sometimes I am able to schedule make-up lessons, in which case you would not have to pay for the missed lesson.


Friday, January 26, 2024

Steve Kaufman's Acoustic Kamp 2024

I am thrilled to be on the staff of Steve Kaufman's Acoustic Kamps! I will be teaching for two weeks this June. (And celebrating my birthday during that time as well!) Every summer, this award winning and all-inclusive music Kamp is held at Maryville College in the foothills of the great Smoky Mountains. Make this year YOUR year to get out and pick! I will be teaching ultra beginners of all instruments and am so excited to get you playing with others!

Old Time and Traditional Week is June 9-15, 2024, and Bluegrass Week is June 16-22, 2024.
Check it out at www.Flatpik.com
The instruments taught during Old Time Week are Old Time Fiddle, Old Time Mandolin, Hammered Dulcimer, Old Time Banjo, Mountain Singing, Flatpicking, Rhythm Guitar, Celtic Guitar, Irish Fiddle, Fingerpicking and Mountain Dulcimer.
Bluegrass Week: Flatpicking, Bluegrass Banjo, Mandolin, Songwriting, Swing Rhythm Guitar, Dobro™, Bluegrass Fiddle, Bass, Ukulele, Bluegrass Rhythm Guitar and Bluegrass Vocals.
I am so glad to be a part of Kamp this year, and I hope to see you and your friends at SKAK in June.
If you have any questions or concerns, you can send a direct email to steve@flatpik.com.


Chris' 2024 Private Lesson Schedule


Chris will not be teaching private lessons on the following dates:

January 1,2
February 5, 6, 7, 8, 12
March 11, 12, 13, 14
April 15, 16, 17, 18
May 13, 14, 15, 16 
June 10, 11, 12, 13, 17, 18, 19, 20
July 22, 23, 24, 25
August 12, 13, 14, 15
September 2, 3, 4, 5
October 21, 22, 23, 24
November 25, 26, 27, 28
December 23, 24, 25, 26, 30, 31
January 2025:  1, 2

It is important that you understand your lesson time is reserved for you.  If you are unable to make a lesson, please me know as soon as possible.  If you miss a lesson, you will be expected to pay for that lesson unless you are sick or have a true emergency.  If you are missing a lesson because of a birthday party, date, prom, school event, vacation, etc., you will be expected to pay for the missed lesson(s). This has always been store policy, but it has not always been strictly enforced.  If you have frequent emergencies or illnesses, we can discuss what the best solution would be.  Sometimes I am able to schedule make-up lessons, in which case you would not have to pay for the missed lesson.

Monday, January 16, 2023

Chris' 2023 Private Lesson Schedule

Chris will not be teaching private lessons on the following dates:
January 30, 31 
February 1, 2, 6, 7, 8, 9
March 13, 14, 15, 16
April 3, 4, 5, 6
May 1, 2, 3, 4
June 12, 13, 14, 15, 19, 20, 21, 22
July 24, 25, 26, 27
August 14, 15, 16, 17
September 4, 5, 6, 7
October 9, 10, 11, 12
November 20, 21, 22, 23
December 25, 26, 27, 28
January 2024: 1, 2 

It is important that you understand your lesson time is reserved for you. If you are unable to make a lesson, please me know as soon as possible. If you miss a lesson, you will be expected to pay for that lesson unless you are sick or have a true emergency. If you are missing a lesson because of a birthday party, date, prom, school event, vacation, etc., you will be expected to pay for the missed lesson(s). This has always been store policy, but it has not always been strictly enforced. If you have frequent emergencies or illnesses, we can discuss what the best solution would be. Sometimes I am able to schedule make-up lessons, in which case you would not have to pay for the missed lesson.
Saturday, May 28, 2022

Oh My Bow!

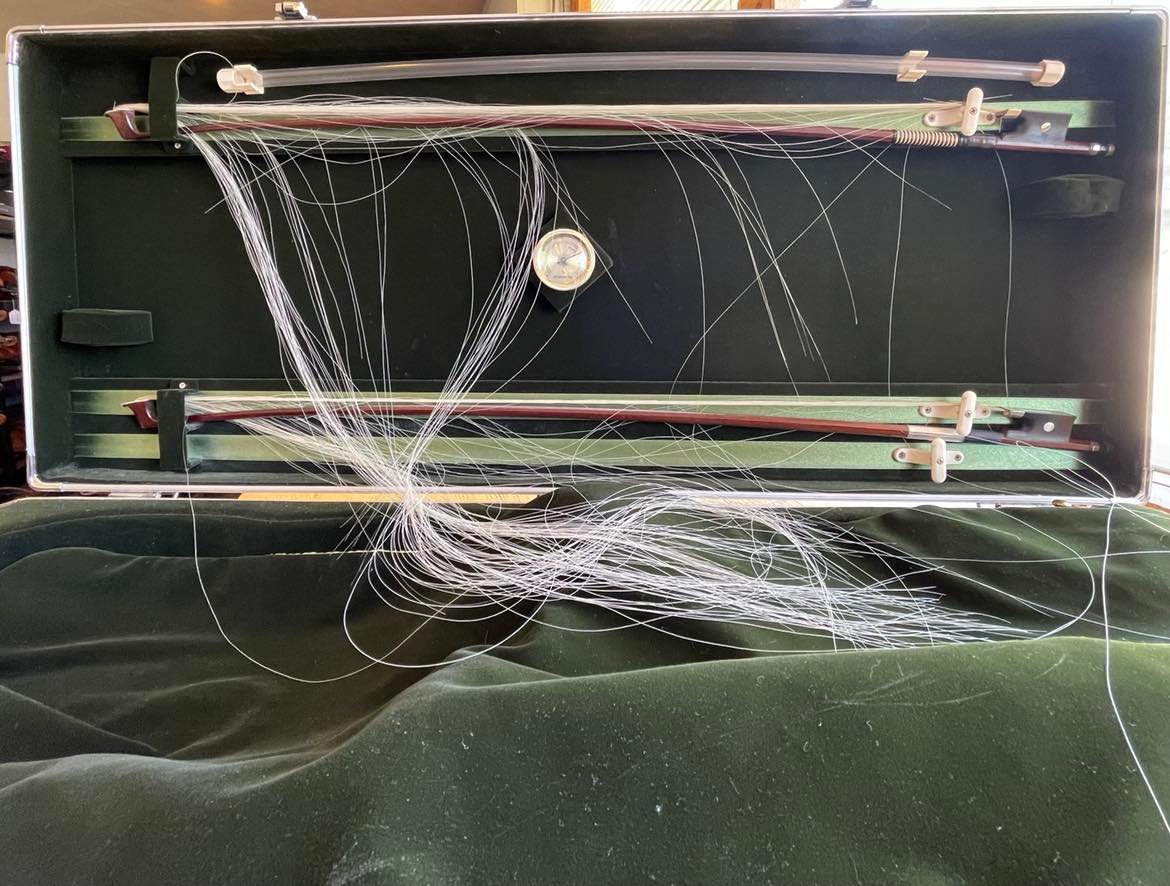
 Have you ever opened your case to this?!


If so, let me introduce you to carpet beetles!  These are tiny beetles that like horse hair from your bows, dark places, and other things.  They will even eat holes in your sweaters!  Think that your house is clean and won't get them? Think again!  They can fly in or can be introduced through cut flowers that are brought into your house.  

Carpet beetles are super common, and if you have a case that is closed for any length of time, especially if you are simply storing an instrument and bows, you will be very likely to encounter them.  What I think is amazing about this is that it will look like someone took a pair of scissors and cut all the hair across in the same place!  If you look closely, you may see the larvae or the larvae skin that has been shed in your case.

Here is what the larvae looks like.  They are tiny!


The beetles themselves are the size of the pin head or smaller.  There are several different types, but the ones I see here in the St. Louis region look similar this.  Remember, they are tiny, tiny!  Not even close to being as big as a lady bug.


So how do you prevent them?  Make sure that anything that they will like is sealed tightly.  A zipper is not tight enough, nor is a normal case that is closed.  You can store bows in air-tight plastic holders.  You can also seal storage containers with tape.  I use moth balls to repel them, but you need to be careful about children and materials that the mothballs may come into contact with.  For prevention and treatment, there is a lot of great advice from The University of California's Agriculture and Natural Resources page here:  http://ipm.ucanr.edu/PMG/PESTNOTES/pn7436.html


Friday, May 20, 2022

What is the Difference Between Old Time (Folk) Music and Bluegrass?

Old time folk music and bluegrass music share many of the same tunes, but there is actually a big difference between the two types of music.  I teach both styles here at The Bluegrass Shack, but many times, one style of music is better suited for an individual than another.  So what's the difference?  Why would you want to play one genre over another?

Both types of music basically come from the same background.  I've already said they share many of the same tunes.  Two of the biggest differences are:  1) the complexity of the music; and 2) how it is played within a group.

The easiest way to spot whether you are watching an old time folk jam or a bluegrass jam is to see how people are playing the music together.  In an old time jam, everyone plays melody all at the same time.  Many times, people all sing the melody together at the same time as well.  There may be a little bit of difference in the actual instruments that play.  For instance, you are more likely to see a dulcimer in a folk jam than you are in a bluegrass jam.  A dulcimer just isn't typically a bluegrass instrument.  And for old time music, you do not need to know how to play backup unless you are the guitar or bass player.

In a bluegrass jam, everyone takes turns playing the melody, and when you aren't playing the melody, you are expected to play something different called backup.  This requires you to know the chords to a song and to be able to keep rhythm with the chords while someone else plays the melody.  Only one person sings the melody (lead) at a time, though others may join in on the chorus to sing harmony.  If you are in a bluegrass jam and you play the melody along with someone else, you are likely to be seen as rude.  You are, in essence, stealing someone else's turn to play lead.  If you sing or play melody behind the singer while the singer is singing, you are also seen as being rude.

Old time music is generally simpler in form than bluegrass.  This doesn't mean that old time music can't be complex, or that bluegrass music is always more complicated.  It is just a generalization.  What the instruments play is also slightly different.  Old time banjo is almost always a type of frailing or clawhammer more typical of Grandpa Jones, whereas bluegrass music generally utilizes a three-finger style more typical of Earl Scruggs.  The fiddle in old time music doesn't shift positions as much (move the left hand from the scroll position up the fingerboard), and variations to tunes are usually less and simpler.  A bluegrass fiddler will shift positions more often, even using shifted double stops (two notes played at the same time).  These are just a few of the differences in two instruments, but there are more that I won't be going into right now.

So how do you know what type of music you might want to pursue if you like songs like Soldier's Joy, I'll Fly Away, Arkansas Traveller and Will the Circle Be Unbroken?  Folk music can be a great way to get a start on either genre.  Why?  Because you can play it with other people at the same time.  It makes learning to play with and in front of others easier than bluegrass because everyone is doing it at the same time.  You are not singled out to play the melody, and you don't have to know how to do backup.  If you decide later you need more of a challenge or that you would like to have the opportunity to "strut your stuff," you can always shift more towards bluegrass.  If only one type of music is prevalent in your area, go with it!  You can always modify later.  

Don't wait and don't think it's too late to start!  I have taught folks of all different ages and abilities, and it is WAY more about how much you want it than it is natural talent.  I think you'll find both of these styles of music a great way to meet people, and great way to learn new skills, and a TON of fun!

Tuesday, March 8, 2022

Steve Kaufman's Acoustic Kamp

I am thrilled to be on the staff of Steve Kaufman's Acoustic Kamps! I will be teaching for two weeks this June. (And celebrating my birthday during that time as well!) Every summer, this award winning and all-inclusive music Kamp is held at Maryville College in the foothills of the great Smoky Mountains. Make this year YOUR year to get out and pick! I will be teaching ultra beginners of all instruments and am so excited to get you playing with others!

Old Time and Traditional Week is June 12-18 Bluegrass Week is June 19-25
Check it out at www.Flatpik.com
The instruments taught during Old Time Week are Old Time Fiddle, Old Time Mandolin, Hammered Dulcimer, Old Time Banjo, Mountain Singing, Flatpicking, Rhythm Guitar, Celtic Guitar, Irish Fiddle, Fingerpicking and Mountain Dulcimer.
Bluegrass Week: Flatpicking, Bluegrass Banjo, Mandolin, Songwriting, Swing Rhythm Guitar, Dobro™, Bluegrass Fiddle, Bass, Ukulele, Bluegrass Rhythm Guitar and Bluegrass Vocals.
I am so glad to be a part of Kamp this year, and I hope to see you and your friends at SKAK in June.
If you have any questions or concerns, you can send a direct email to steve@flatpik.com.


Monday, January 24, 2022

Chris' 2022 Private Lesson Schedule


Chris will not be teaching private lessons on the following dates in 2022:

 February 3, 14, 15, 16, 17

March 21, 22, 23, 24 

April 25, 26, 27, 28

May 23, 24, 25, 26

June 13, 14, 15, 16, 20, 21, 22, 23

July 18, 19, 20, 21

August 1, 2, 3, 4

September 5, 6, 7, 8

October 10, 11, 12, 13

November 21, 22, 23, 24

December 22, 26, 27, 28, 29

January 2023: 2, 3

Friday, December 31, 2021

Renting Instruments: Cost Effective?

Have you ever considered renting to own a musical instrument?  Worried your kids won't stick with it and you'll be stuck with an expensive instrument?  Think that it's cheaper to rent?  You might be surprised at the answer!  Since the most commonly rented instruments are from the violin family or band instruments, this short blog is directed towards those two categories of instruments.

As a former music teacher (I taught band and choir in the private school sector for almost 10 years), most of my students never rented a musical instrument for band.  I spent the summers helping parents look for instruments and then fixing them up.  Many of my students would not have been in band otherwise.  The cost of the private school, plus the cost of a musical instrument was just too much, especially for larger families.  Most instruments cost my students $50-$100, and these were the name brands all band directors look for:  Bundy, Selmer, Vito, Conn, Blessing, Yamaha, etc.

When I opened The Bluegrass Shack, I was determined to never rent musical instruments.  It simply is not a cost effective way to own a student level musical instrument.  For those that are local and don't need shipping, we have violin outfits starting out at $125 that include the instrument, case & bow -- and a professional setup!  For a violin or viola, that setup will cost you at least $100 at most violin shops, and that is what makes the difference between something that is easy to play, and something that is hard or impossible to play.  Not to mention an improperly setup stringed instrument will many times not play in tune even if it is in tune.  The Bluegrass Shack also has a 100% trade in policy for all violins/fiddles.  That allows you to upgrade at any point without losing any of your investment.

We also offer a small selection of used and new band instruments starting at around $100.  We don't have the trade-in policy on these instruments, but for a fraction of the cost of renting to own, you can own your instrument.  

If your child decides not to play anymore, you won't be out near as much as you would be if you were renting, plus you can sell the instrument and recoup all or most of what you paid for it!  Don't want the hassle of selling?  Give it away!  Donate it to the school or to another child!

Sunday, October 17, 2021

DIY Ukulele Kit!

 Just in time for Christmas or really for any time you want to try your hand at making a musical instrument!  This do-it-yourself soprano ukulele kit is perfect for first timers, and it is only $35!  I have a limited number of these left for purchase, but you can pick yours up now until I run out!  

Everything you need to make your own ukulele is included, though there are a few additions you might want to consider.  What's included?  All the parts, including strings and picks, and even some gloves, sandpaper block, glue, screwdriver, tuning machines, and instructions.  What additions do I suggest?  First off, I have included my own set of revised/additional instructions to go along with the ones that are included because we all know how poorly these things are written by the company.  I also suggest the yellow wood glue (it comes with white), stain instead of the colored paints, some additional fine sandpaper, and some heavy duty rubber bands and/or small clamps.  


How long does it take to build one of these?  How difficult is it?  Well, it's really not all that hard to put it together.  A child will need some help and supervision, but a teenager may only need help with clamping and possibly following some of the directions.  Most adults shouldn't have much of a problem putting this together.  It does take a couple of days to complete, though, because you will have to let the glue dry and set, and you will have to let whatever finish you use (stain or paint) dry before finishing everything up.  It also depends on how fancy you get.  If you just stain it, that won't take you long at all!

Here are some pictures of the one I made.  I stained mine, then spent at least a week painting designs on the front and back.  I used acrylic paints I bought from Walmart.  I used a clear lacquer spray to protect it all when I was done with painting.  I upgraded the tuners because I like the look of closed gear tuners and black buttons over the open gear tuners with white buttons that are included with the kit.  The included tuners work just fine -- it was a cosmetic thing to me.  I also modified the bridge and saddle after I discovered that the ukulele didn't intonate properly.  That is fixed with the additional instructions I wrote that are included with every kit.  You won't have to modify yours if you follow those directions.  Intonation won't be perfect on these, but it is pretty good if you follow the directions.


If you need it shipped, there will be a shipping charge added to your purchase. And one other note, these come in a pink unicorn box.  Sorry about that!  They aren't just for females, but I doubt boys will be as excited about the box as girls.  You may want to repackage!

Monday, January 25, 2021

Chris' 2021 Private Lesson Schedule

 Chris will not be teaching private lessons on the following dates:

 February 8, 9, 10, 11                                

March 1, 2, 3, 4                                                           

April 5, 6, 7, 8                                                              

May 10, 11, 12, 13                                                      

June 14, 15, 16, 17                                                      

July 5, 6, 7, 8, 15                                                               

 August 9, 10, 11, 12, 16, 17, 18, 19, 23, 24, 25, 26

September 13, 14, 15, 16

October 18, 19, 20, 21

November 22, 23, 24, 25

December 22, 23, 24, 27, 28, 29, 30

January 2022: 3, 4

It is important that you understand your lesson time is reserved for you.  If you are unable to make a lesson, please me know as soon as possible.  If you miss a lesson, you will be expected to pay for that lesson unless you are sick or have a true emergency.  If you are missing a lesson because of a birthday party, date, prom, school event, vacation, etc., you will be expected to pay for the missed lesson(s). This has always been store policy, but it has not always been strictly enforced.  If you have frequent emergencies or illnesses, we can discuss what the best solution would be.  Sometimes I am able to schedule make-up lessons, in which case you would not have to pay for the missed lesson.


Saturday, January 18, 2020

Making a Fiddle - Day 9

I am making a Strad model, so I had to mark all the blocks where the lining needs to go. This includes depth and length. A razor blade and a small hammer are used to make the initial cuts into the blocks.


I used a very small chisel to clean up the tunnels in the blocks where the lining will go.


Using a super flexible ruler, I measured the distance in between the cuts in the blocks so I would know how long to cut the lining.


After bending the lining, I had to make sure each piece fit snugly into the "tunnels" and against the ribs.


The linings are made from spruce. They have to be bent to fit the curvature of the ribs and also into the blocks. Each piece of lining has to be dipped into water and then bent on the bending iron. I used a small block of wood to help bend the lining pieces.


I needed about 30 clothespins to clamp the lining to the ribs. The clothespins have to be taken apart and put back together again backwards. A heavy rubber band is wrapped around each clothespin to make it stronger.  Rosemary and Emily helped me retrofit all the clothespins!


Hide glue is used on the lining and also on the ribs where the lining will be glued. You have to work fast!


Emily was helping me by holding the form when I was brushing on the glue, and also with the actual clamping.


Using a damp rag, all the excess glue has to be wiped off so the clamps don't stick to the ribs or the mold, and so there is not excess glue everywhere.


Believe it or not, these clamps are so strong some of them took two hands to open them!


Here you can see me readjusting the spacing of the clamps so that there aren't any gaps, especially near the blocks.


This is what it looks like with all the clamps on it!


Here is a closeup of the lining going into the edges of the endblock.


Here is a closeup of the lining going into a corner block. Note how one side goes into the "tunnel," and the other side is just a wedge fit.


Here is the entire form with all the lining done and sanded level with the ribs. Next step is carving the back!

Making a Fiddle - Day 8

I used a chisel to trim down the ribs.  When done correctly, the seam at the corners becomes almost invisible!  I had to be very careful when chiseling the maple.  It is so easy to chip the ribs!  I ended up going at an angle from the top down -- and I didn't go all the way down to the board. I would flip it over and then go the other direction. Then I would work on the middle section, and finish it out with a rasp to get it perfectly level and square.


After trimming the ribs with the chisel, I used a rasp to smooth out and level the edge. It should be perfectly straight.


My sanding board is 16" x 24". It can be made from granite (which is pretty heavy, but flat), or it can be made from a board. I used 5-ply plywood. It took a good two hours to make this completely level! I used planes, scrapers and sandpaper to accomplish this.


I used a long, thick straight edge to check for high and low spots and warping. It has to be level everywhere: top, bottom, sides, and diagonally. After the board is level, I cut large pieces of sandpaper (from sanding belts) to fit the board. I used coarser grain on one side and finer grain on the other side. The sandpaper was attached to the board using spray adhesive.

You can see me using the sanding board in this picture. I am sanding the rib structure on my sanding board. It is important not to press down too hard or the ribs can break. Back and forth and circular motions across all parts of the board are important to keep the rib structure perfectly level. This has to be done on both sides of the rib structure.
Both sides look like this now!
Here is a closeup of two corners.


I still have a long ways to go, but it won't be long and I'll be rid of this mold and start work on the top and back.


Thursday, January 2, 2020

Chris' 2020 Private Lesson Schedule

Chris will not be teaching private lessons on the following dates:

February 10, 11, 12, 13
March 9, 10, 11, 12
April 6, 7, 8, 9
May 25, 26, 27, 28
June 15, 16, 17, 18
July 6, 7, 8, 9
August 10, 11, 12, 13
September 14, 15, 16, 17
October 19, 20, 21, 22
November 23, 24, 25, 26
December 21, 22, 23, 24, 28, 29, 30, 31

It is important that you understand your lesson time is reserved for you.  If you are unable to make a lesson, please me know as soon as possible.  If you miss a lesson, you will be expected to pay for that lesson unless you are sick or have a true emergency.  If you are missing a lesson because of a birthday party, date, prom, school event, vacation, etc., you will be expected to pay for the missed lesson(s). This has always been store policy, but it has not always been strictly enforced.  If you have frequent emergencies or illnesses, we can discuss what the best solution would be.  Sometimes I am able to schedule make-up lessons, in which case you would not have to pay for the missed lesson.

Saturday, December 21, 2019

Making a Fiddle - Day 7

This day made a big difference in how my fiddle looks.  It is actually starting to look like a fiddle!  I have all the ribs glued to the blocks now.  Here are the steps I completed this day.

I started by deciding which way I wanted the flaming on the wood to go.  The flames on my ribs are slightly angled, so I decided to make all the flames angle back towards the bottom (end block area) of the fiddle.  I marked the ribs lightly in pencil with LL (lower left), LR (lower right), UL (upper left) and UR (upper right).  I also drew arrows that faced the endblock (lower ribs), and the neck block (upper ribs).  Then I started measuring and cutting the length of the ribs.  I marked the center of the upper and lower blocks.  I used a very flexible, clear ruler for measuring.  It conforms to all the curves so I could get a very accurate measurement.  I added a little bit of length to the measurements so that the ribs would extend beyond the corners.  (They will be trimmed later, but this makes for an almost invisible corner joint.)


The lower ribs have to fit perfectly so that there will not be a gap at the endblock.  I used the square and a file to get this correct.  After the lower ribs are bent, the ends are glued together, taped and clamped with a counter block.  (I'll explain counter blocks in more details later on in this entry.)  This keeps the fit perfect when you clamp the ribs to the endblock.


To bend the ribs, I first had to dip the ribs in a small bucket of water.  Then I used the rib bender and sometimes the bending strap.  I personally prefer not to the use the strap because I can't feel when the wood starts to "give."  When the wood starts to give, it can be bent without it cracking or breaking (but sometimes it does anyway).  Sometimes it was necessary for me to use the bending strap because the wood needed the support on certain curves, or because I needed to work so close to my fingers that the heat and steam would have burned me.  I kept the mold nearby so that I could keep checking to see if I was making the curves correctly.  The ribs have to fit the mold and blocks with no gaps.  It was a little tedious, but not too bad.  I had to constantly look to make sure I wasn't bending a rib upside-down or backwards.  The arrows and markings that I penciled onto the ribs were very helpful for this.


After all the ribs were bent, it was time to glue the ribs to the blocks.  This is where the counter blocks come into play.  Counter blocks are small blocks of wood that are used to clamp the ribs to the blocks.  They fit perfectly into the curves of the fiddle ribs and give you something to clamp the ribs against.  If you label all your counter blocks after you make them, it makes it easier to know which ones are for which curves.  (Notice the "UL" that is visible on the end of one of the counter blocks in the picture below.  All of these blocks are labelled, but for some reason, only one label happened to be facing up so that it was visible in my picture.)


First, I positioned one rib where it would be glued.  I used a pencil to mark on the rib where the blocks were.  This shows me where I will be putting the glue.  The ribs are only glued to the blocks and not to the mold itself.  It is a good idea to wax the edges of the mold so that any stray glue will not adhere to the ribs.  I got my counter blocks and my clamps ready.  I put hide glue on the block and also on the rib, then I positioned it and clamped it.  This has to be done on a flat surface.  I used a large piece of safety glass.  The ribs stay in contact with the glass, which keeps everything perfectly level and flat on the bottom.  Having another person to help when you are gluing and clamping the ribs is a very good idea!  This makes it so much easier to hold things in place and clamp at the same time.  After the clamp is in place, I wiped off the excess glue with a damp cloth.  I did this as I clamped each rib rather than waiting until I was done with all of them. Hide glue sets pretty quickly.


It is important to make sure the clamps are positioned in the center of the counter blocks so that pressure is applied evenly to the rib and there are no gaps.  After all the clamps are in place, I picked up the mold and wiped off excess glue from the bottom of the ribs and blocks.  This is what it looked like with all the clamps in place.


This is what it looks like after I removed the clamps.


It won't be long and I'll be starting on the top and back!  Yay!